
MPPT or PWM: what's the real difference for a van or RV setup?
On the roof of a camper van or an RV, the solar charge controller is the component most often overlooked, even though it directly decides how much energy actually reaches the battery. Two technologies share the market: PWM (Pulse Width Modulation) and MPPT (Maximum Power Point Tracking).
A PWM controller behaves like a simple switch between the panel and the battery: it pulls the panel's voltage down to roughly battery level, wasting a large share of the available power as soon as the panel's voltage sits well above the battery's (a modern panel with a 36-40V open-circuit voltage on a 12V battery, for instance). An MPPT controller constantly hunts for the operating point that maximises the power actually drawn from the panel, then converts the extra voltage into additional charge current.
In practice, for a nomadic setup with one or two 100 to 400W panels on a 12V or 24V battery, the real-world gap usually sits between 15 and 25%, mostly driven by how far the panel's voltage sits above the battery's, and by how often the array falls into partial shade (trees, buildings, a vehicle parked alongside). MPPT becomes close to mandatory as soon as several panels are wired in series rather than in parallel, a setup that specifically raises the voltage at the controller's input. For a deeper look at real-world solar charging performance on the road, see our feature solar charging, promise versus reality.
How to properly size your MPPT controller
Before picking a model, work out the required charge current. The reference formula: controller current (A) ≥ panels' peak power (Wp) × 1.25 ÷ nominal battery voltage (V). The 20 to 25% margin absorbs power peaks in cold weather and the gradual loss of precision as panels age.
| Panel power | 12V battery | 24V battery |
|---|---|---|
| 100 W | ~10 A | ~5 A |
| 200 W | ~20 A | ~10 A |
| 400 W | ~40 A | ~20 A |
| 600 W | ~60 A (24V recommended) | ~30 A |
The second figure to check before buying: the controller's maximum PV input voltage, which must never be exceeded by the panel's open-circuit voltage (Voc), especially on cold mornings when Voc climbs noticeably. A controller limited to 75V input only allows a single standard panel per string; a 100V or 150V model lets you wire two or three panels in series, which cuts line losses over long cable runs, a common situation when the panel sits at the back of a long van. For more on choosing and wiring your panels, our guide sizing a nomad solar setup covers the full calculation, panels included.
Our 2026 pick of the best MPPT controllers for nomadic setups
Here is our selection, from entry-level to a controller built for a large setup. All four have proven themselves on nomadic installations, camper vans, RVs or boats alike.
| Model | Max PV input | Charge current | Monitoring | Best for |
|---|---|---|---|---|
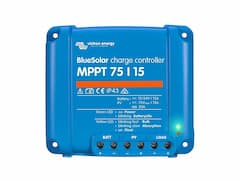
| Victron BlueSolar MPPT 75/15 | 75V | 15A | No Bluetooth | Tight budget, small setup |
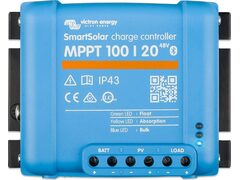
| Victron SmartSolar MPPT 100/20 | 100V | 20A | Built-in Bluetooth | 12V van, all-round use |
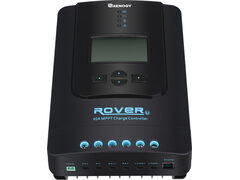
| Renogy Rover 40A | 100V | 40A | LCD screen, optional Bluetooth | Larger 12/24V setup, phone-free monitoring |
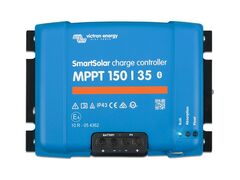
| Victron SmartSolar MPPT 150/35 | 150V | 35A | Built-in Bluetooth | Series-wired panels, high power |
The Victron BlueSolar MPPT 75/15 is the most sensible entry point from a trusted brand: no Bluetooth, but genuine MPPT electronics with automatic 12/24V detection. Enough for a single 100 to 150W panel on a small van.
The Victron SmartSolar MPPT 100/20 is our all-round reference: up to 98% tracking efficiency, built-in Bluetooth to watch production from the VictronConnect app without opening the technical locker, and a 100V input that still allows two panels wired in series. This is the model we recommend by default for a 12V van carrying 200 to 300W of panels.
The Renogy Rover 40A targets larger setups (up to roughly 500-600W on a 12V battery) and stands out with its built-in LCD screen, handy for checking production without reaching for a phone, a real plus in winter when you don't want to take your gloves off.
The Victron SmartSolar MPPT 150/35 is the only controller in this selection rated up to 150V input: the model to pick as soon as two or three panels are wired in series, a setup that cuts line losses on a long van. Its tracking efficiency of up to 98% and built-in Bluetooth make it a safe bet for an ambitious setup.
Bluetooth, screen, heat: the criteria that matter day to day
Beyond voltage and current, a handful of criteria make a real difference once the controller is installed and tucked out of sight under a technical floor.
- Bluetooth monitoring (VictronConnect on Victron models, an optional BT-2 module on Renogy): check the day's production at a glance, tweak charge settings without opening the enclosure, and quickly spot an underperforming panel (permanent shade, a corroded connector).
- Built-in LCD screen (Renogy Rover): handy if the controller isn't easily reachable for a phone, or for anyone who prefers a permanent display over an app.
- Programmable charge profiles: essential for a LiFePO4 battery, whose absorption and float voltages differ noticeably from lead-acid/AGM/gel. Every controller in this selection offers a preset or customisable lithium profile.
- Heat dissipation: a controller that overheats automatically reduces its output current (derating) to protect itself. Plan for a ventilated spot, never a fully sealed locker in direct sun.
Installation mistakes to avoid
A good controller installed badly loses most of its appeal. A few points worth checking every time:
- Never exceed the controller's maximum PV voltage, including on a cold morning when the panels' open-circuit voltage climbs noticeably higher than a measurement taken in midsummer heat.
- Check the battery mode: automatic 12/24V detection or manual setting, and confirm the charge profile matches the battery actually fitted (lead-acid, AGM, gel or lithium), especially after swapping batteries on a vehicle that was already wired up.
- Respect polarity and fuse every circuit with a fuse or breaker rated for the controller's output current, on both the panel side and the battery side.
- Use the right cable gauge for the distance between panel, controller and battery: too thin a cable causes a voltage drop that quietly cuts the power actually delivered to the battery, a fault that's invisible without a multimeter.
- Place the controller somewhere ventilated, away from moisture and away from a direct heat source (engine, heater), to avoid the thermal derating mentioned above.
For the next step, wiring everything through to the battery, our guide how to install a solar kit covers the full wiring, step by step.